please note: recorded on mini disc --may notice occassional slapping sound its not the instrument--park is on river and mosquitos like jazz too -- intense 6pm to 8pm

The Electric Upright Bass is based on the the traditional double bass scale length commonly 41.5 in. and contoured neck/fingerboard so as to allow bowing of each individual string. This concept was first made popular in the 1950's with the Ampeg Baby Bass and has evolved since with a dozen major manufactures of electric double basses emerging. The advantage for players is the convience of a more portable instrument.
The challange for the builder/designer is to create an instrument that captures as closely as possible the sound of the acoustic double bass. In the electric version there is much less reliance on acoustic design considerations as most EUBs do not have a hollow chambered body that resonates. While acoustic design is still somewhat a consideration the EUB relies more on the piezo pickup or magnetic pickups or combinations of the two; along with the resonation/vibration of the bridge assembly. Commonly the majority of EUB's rely on piezo pickup placement with the pickup either placed in or under the bridge. Piezo pickups are typically either one of two types a ceramic crystal or a piezo film. Vibrations absorbed through the bridge from the plucked or bowed strings causes current to be generated by the piezo element and it is this electrical singal that produces the amplified tone. Magnetic pickups also generate electric currents and the difference between the two is that the piezo creates high impedence while magnetic pickups generate low impedence current. The important consideration here is that most bass amplifiers have only an input for low impedence signal and this is a problem for a "piezo pickup equiped instruments" and thus may require a preamp buffer to make the signal compatable with low impedence inputs in most amplifers. Some amps are designed with high impedence inputs such as the Acoustic Image or the EA (Euphonic Audio) and in these cases no preamp buffer is necessary. Many of the commercial production EUB's have preamps onboard with some equalization ability typically bass, mid, and treble frequency control as well as a volume control; this makes the instrument more compatable with input into various bass amps and recording consoles as well as PA systems.
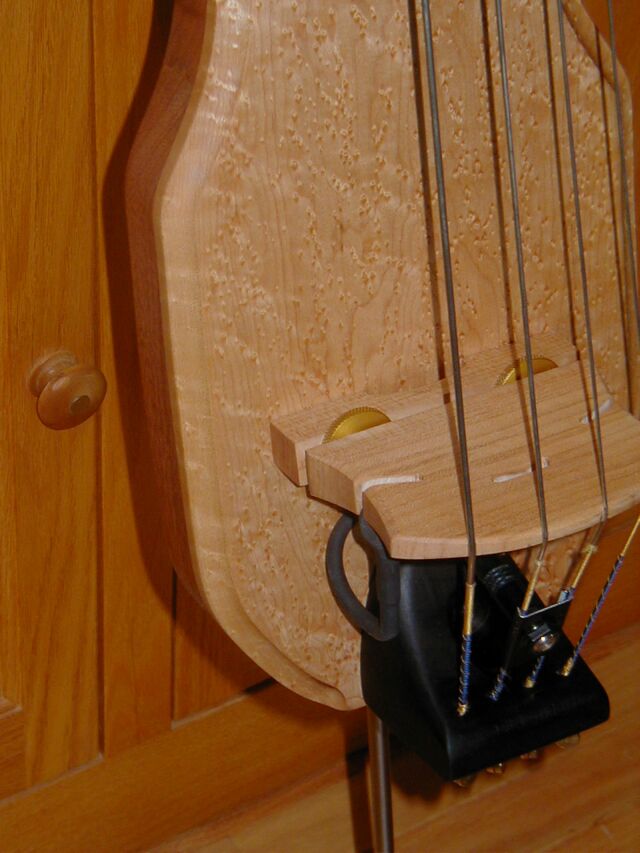
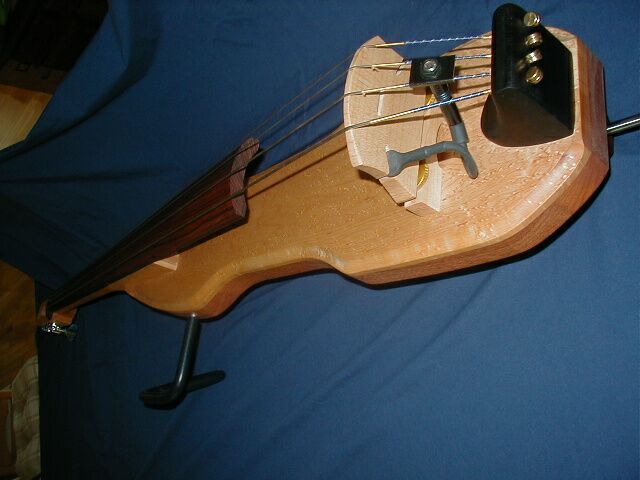
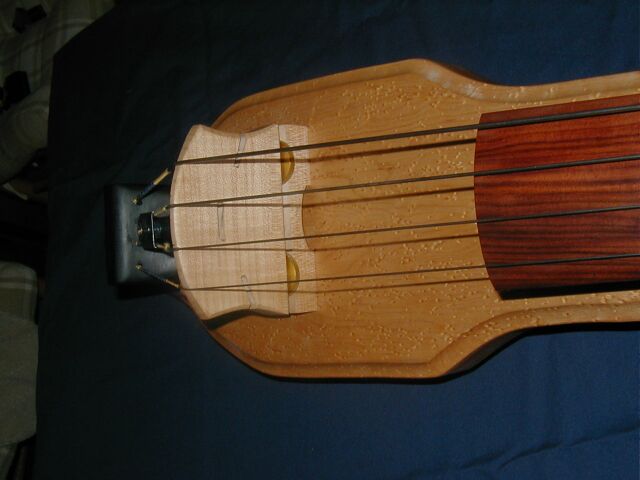
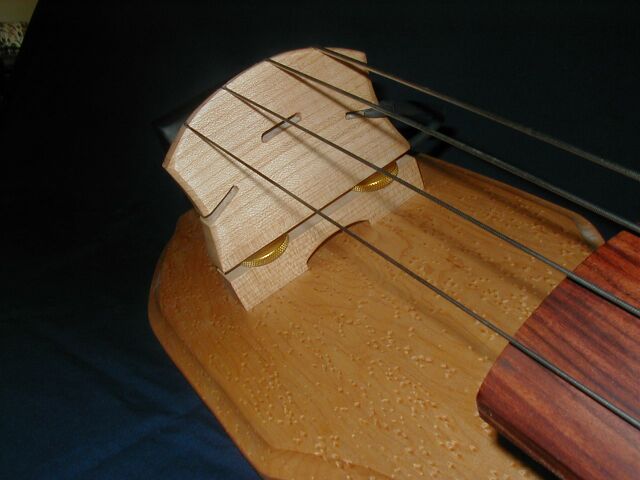
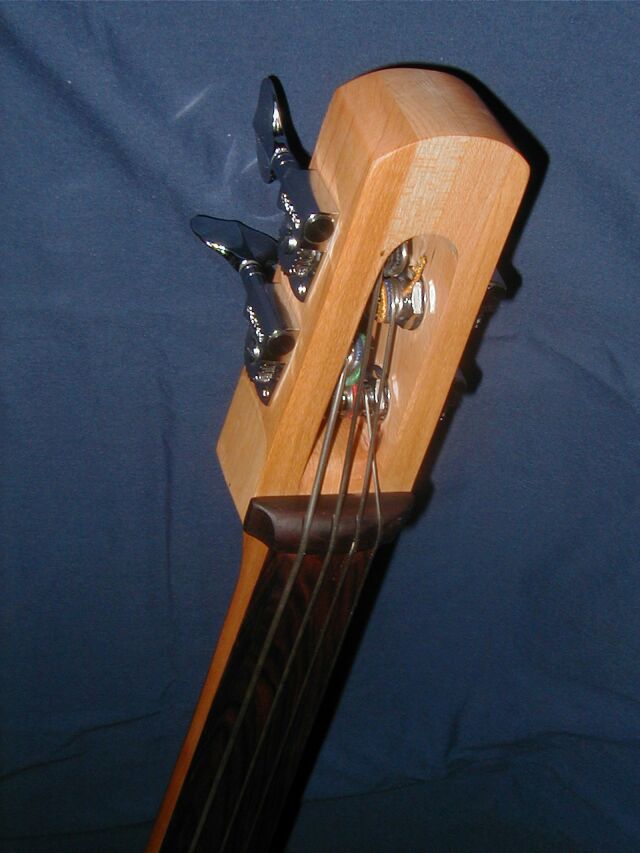
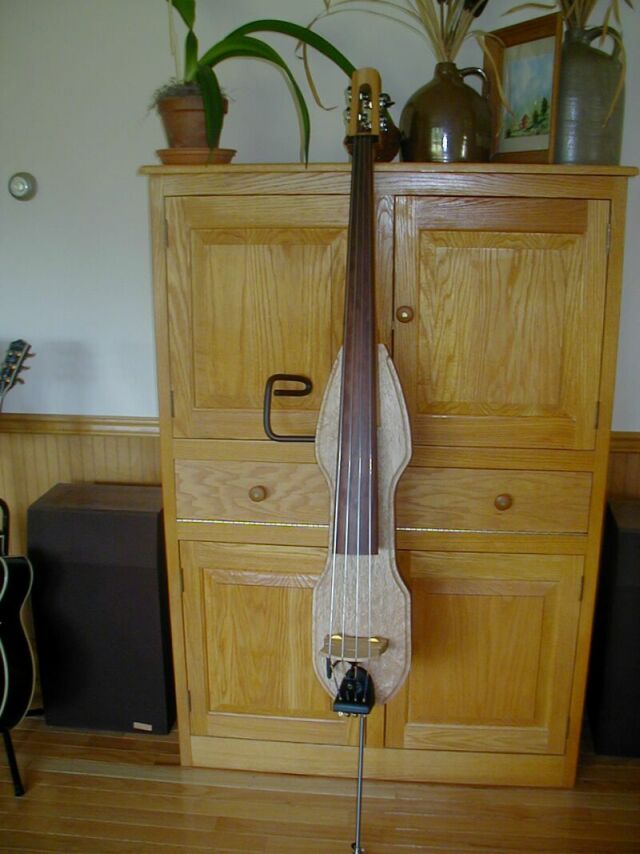
My EUB project is the result of several months of research studying both commercial and home built designs and the result is the U-EUB ( Utter Electric Upright Bass). In my opinion the most refined designs are the Azola, Zetia, NS and the Fitchner EUB's. My design borrows from these as well as incorporating some of my own concepts. Materials used were assembled from numerous sources and the inital prototype has a Birdseye Maple top laminated to a Mahogany body. Fingerboard is Rosewood and and the neck is laminated 3/4 inch Maple with a Rosewood nut and African Blackwood (ebony) tail piece and a quatersawn Maple bridge. The block support on the backside of the instrument that supports the 3/8 inch end pin support is Cocobolo. The neck has a 3/8 square bar to reinforce the neck and the tuners are Titan Grover tuners. The piezo is a KK-Bass Max which can be inserted into the bridge on either the treble,bass or middle of the bridge for different tonal characteristics. The bass was built for my son Jeff who plays double bass and also as a prototype for developing and advocation as a builder designer. I've included a materials source and price list in the event anyone wishes to build a similiar instrument. My instrument does not use an onboard preamp as it is played thru a Euphonic Audio high impedence amp which accepts the high impedence input of the piezo pick up. I did develop my own out board preamp in the event the instrument needs to be input into a low inpedence amplifer input. I plan to offer onboard preamp/equilization it as option on latter EUB models.
( 3/8" precision ground unhardened steel shaft 24") & ( button head hex drive 1/4-20 x 2" bolt)
---(-aircraft grade square tube 3/8" 3ft.) & (high strength steel knife-thread hex drive inserts)
--- (phenolic fluted rim knob 1/4 -20 x 3/4 threaded steel stud x 1-1/4 dia) ---- McMaster Carr
This represents the main costs to build this instrument--please note however that certain items were sold in lot sizes such as bolts and screws that would enable 3 or 4 instruments to be built ---raw materials (wood) could in the instance of ebony able to make 2 tail pieces and the quatersawn maple could make 8 bridges--etc. so the actual cost for this instrument if pro-rated would be less then indicated.
Shop tools used were 10 inch table saw, 12 inch band saw, 6 inch jointer planner, 16 inch Performax drumsander, 15 inch planner, plunge router, radial drill press, ballon sander, orbital sander, cabinet scrapers, cabinet makers rasp, flat file, needle file set, hand electric drill and rotary flex shaft tool. This project had additional expenditures for me in some of the tools needed which I did not already own. I also purchased some items I found I did not need ie: (preamp) and some hardware items I found later locally for less. I will mention that some of the wood stock needed I already had on hand; as such the birdseye maple and is not factored in as is the laminated maple for the neck which I already had. The laminated 5 piece neck I will mention was actually made from 3/4" maple flooring a friend gave me that was left over from a home improvement project. This accountability is only intended to give you an idea of the expenditures. My out of pocket expense given tools, electronics and hardware were by best estimate 550.00 dollars. I estimate my 2nd bass out of pocket production cost will be approx. 300-400 dollars given the materials still on hand from the 1st prototype.
Also not listed is a case for the instrument--it took me some time to locate a carry bag for gigs. My first instinct was to build a plywood case or buy a road case such as an ATA or SKB type case --my son prefers a light weight gig bag-- so after much searching I found the optimal bag to be a "On-Stage" brand "light stand" or "speaker stand" carry all bag-- approx. demensions 5.5' x 1.5' x 1.5' ample room for the bass with additional padding and hopefully enough room for the EUB bass stand I plan to design for my instruments. Cost for the bags (I bought two) approx. 23 to 42 dollars from e-bay vendors --I could not find any regular companies that were carrying these bags the two I purchased were model # LBS 6500 and 7700 with slightly different dimensions --
The bass was built by first laminating 6/4 mahagony to 3/4 in birdseye maple to arrive at a blank that is 8" wide by 32"long x 2" thick. The neck blank is glued from 5 pieces of 3/4"x2" maple with the grain orientation such that the annual growth rings run verticle (bottom to top) . Once the glue is dried the pieces are shapped using templates I developed from drawings and photos. Before shapping the neck however check for squareness and rout in a 3/8" wide by 3/8" deep channel on center starting approx 1" behind the position the nut would be located and extending 18" in the direction towards the end of the neck. This channel is to insert the steel reinforcing rod to prevent neck warpage. The neck angle is also cut before shapping. This can be done by measuring in 6.5" from the bottom side edge and then with a square measure up 3/8" on the side and from this point measure to the bottom corner and this will give you an appropriate neck angle; then carefully cut the angle on the band saw. Likewise with the body of the instrument before beginning the contouring process on the band saw check for squarness and rout in using a plunge router the cavity for accepting the neck (a template was used to do this). This cavity should be approx. 3/8" deep and extend inward into the body just shy of approx 6.5". This cavity will match the flare on the fingerboard so you must be certain to develop your template from the fingerboard itself. Once the cavity is routed the neck can be trial fitted and if correct then 3 holes in a tri-angular layout can be drilled on the backside of the body to bolt the neck to the body (countersunk to accept the button head hex bolts). The holes should extend deep enough into the neck blank to accept the "knife thread" inserts. Once the inserts are in place and the the headstock is shaped and drilled out to accept the tunning machines the fingerboard can be glued to the neck. I used a forstner bit and drilled consecutive holes to make the opening slot for the tuners once roughed out I used a rasp and files to clean up and finish up the opening for the machine heads.
I used yellow carpenters glue for the whole project. The tail piece is made from ebony with the block being 3" x 2.5"---- a sloping profile is developed (see pictures) and using a Forstner 1" bit a hole is drilled to within approx 1/2" of the bottom surface of the tail piece (this is to accept a bolt to secure the tail piece to the body). The edges are then contoured with a rasp and sanded on the ballon sander. Holes are drilled on the radial drill press on a slight angle in line with the projected angle of the strings from the bridge to rear surface of the tail piece. The tail piece is bolted with the single bolt and glued as well.
The bridge is made from quatersawn maple 5" wide x approx 4" high ---the height may vary depending on the neck to body angle and exact height measurments should be made once the neck/fingerboard is bolted to the body. Scale length is 41.5" nut to bridge so the exact bridge height can be determined using a square and ruler by measuring down the fingerboard 41.5" and seeing where that intersects the square then measure the distance down to the body. The bridge is cut into two pieces before shapping with approx 1.25" of height on one side and the balance on the other side. Drill the holes for the bridge adjusters before cutting in two and once cut tap the holes for 1/4-20 thread. Once this process is completed you can shape the bridge. The bridge should be tappered on the upper segment on the front side only from a full 3/4" thickness to 1/4". I develop the profile for the top by drilling a hole on a 3/4 inch square x 24" long piece of wood the hole is drilled on center on the end grain deep enough to insert a pencil - place your bridge blank in the correct position for the 41.5 scale and lie the 24" piece lengthwise on the finger board with the pencil point contacting the bridge --move the piece across the finger board side to side and this will give you the projected contour of the fingerboard on the bridge.
The end pin housing was made from Cocobolo - a 3" wide by 4" long x 1.5 in thick piece with a 3/8" hole drilled to accept the endpin shaft a knife threaded insert is located in the center to accept a 1.25" knob to lock the shaft at the correct height this assembly is screwed to the back side of the instrument using #8 wood screws.
The body support on the side of the instrument is made from 5/16 in steel shaft bent in the vise to the correct contor and "gas line hose" is forced onto the shaft to give a more sustantial covering. The shaft is held in place by drilling a 5/16" hole into the side of the body and an intersecting the hole on the back side with a "knife thread insert" and a 1.25" knob used to lock the assembly in place. The end of the shaft is filed flat on the surface that contacts the thread of the knob this is to hold the assembly in the correct orientation and keep it from slipping during playing.
Bass tuners are installed and the nut filed down to approx 0.025" --a mini needle file set works well for this purpose as well as for seating the strings on the bridge. After assembly the piezo is inserted into the slots in the bridge and and instrument is ready for a trial -- on my inital prototype the bridge is set with the adjusters in the lowest position with the strings about 1/4 to 3/8 inch off the fingerboard at the distal end. The instrument plays well, no string buzzing and the sound is pretty close to the sound of an amplified acoustic upright the only modification requested by my son was to countour the neck profile a bit more needing only a small amont of stock removal to give a more comfortable feel/action.